Mini Pumpkin Hand Pies Recipe
Introduction
These Mini Pumpkin Hand Pies are a delightful fall treat, perfect for sharing or enjoying as a cozy snack. With a creamy pumpkin filling and a flaky crust, they capture all the flavors of the season in a fun handheld package.
Ingredients
- 1 box store-bought pie dough, containing 2 sheets (see notes for gluten-free option)
- 4 oz cream cheese, room temperature
- 1/2 cup (100g) light brown sugar, packed
- 1/2 cup (115g) pumpkin puree
- 1/2 tsp pumpkin pie spice
- Pinch of salt
- 1 large egg
- 1/2 cup (100g) granulated sugar
- 1 tsp ground cinnamon
Instructions
- Step 1: Remove the pie dough from the refrigerator and allow the sheets to come to room temperature while you prepare the filling.
- Step 2: In a bowl, mash together the cream cheese and brown sugar using a fork until smooth.
- Step 3: Mix in half of the pumpkin puree, then add the remaining pumpkin puree along with the pumpkin pie spice and a pinch of salt. Stir until well combined.
- Step 4: Preheat the oven to 400°F (200°C) and line a large baking sheet with parchment paper.
- Step 5: Lightly dust your work surface with flour and unroll one sheet of pie dough. Use a rolling pin to gently smooth out any wrinkles and ridges.
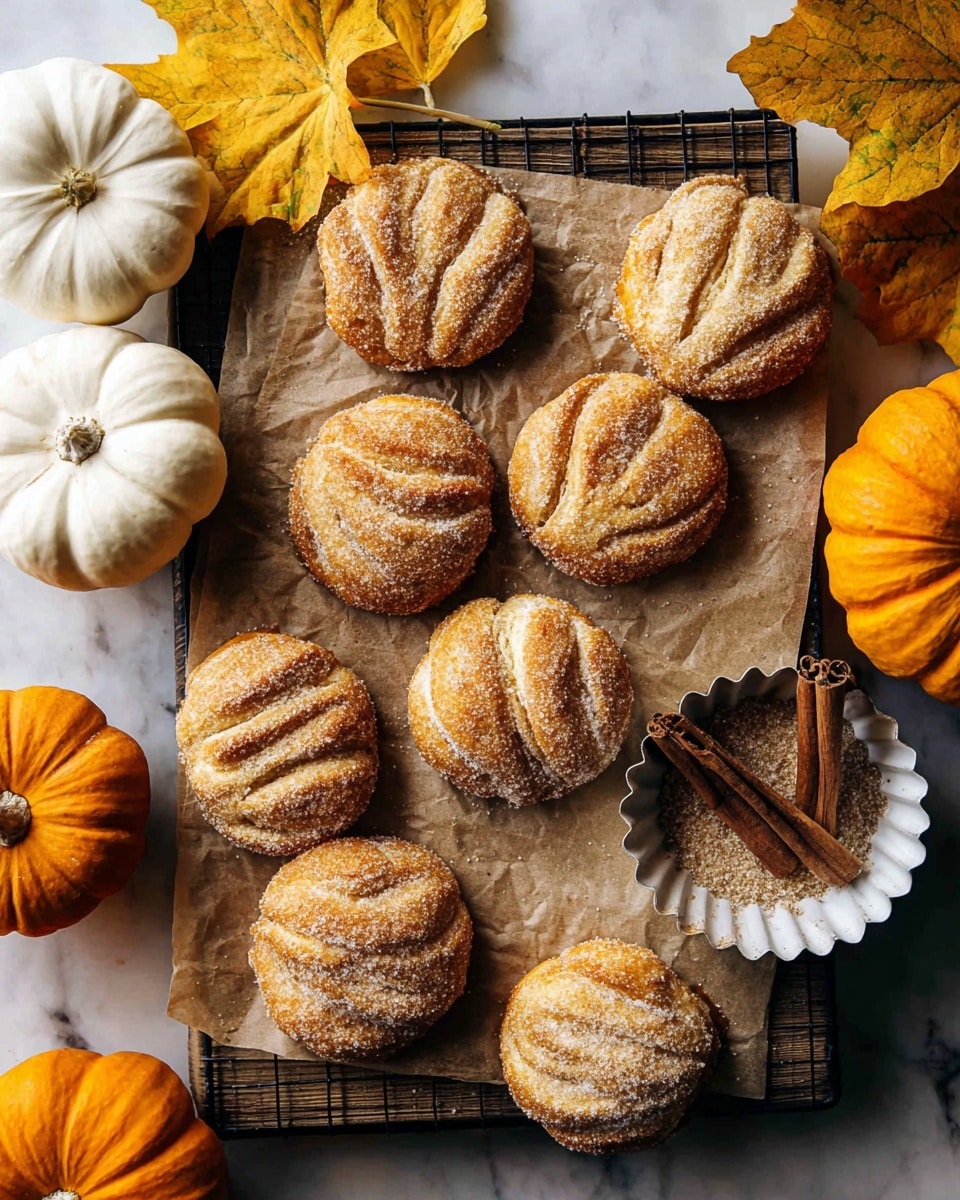
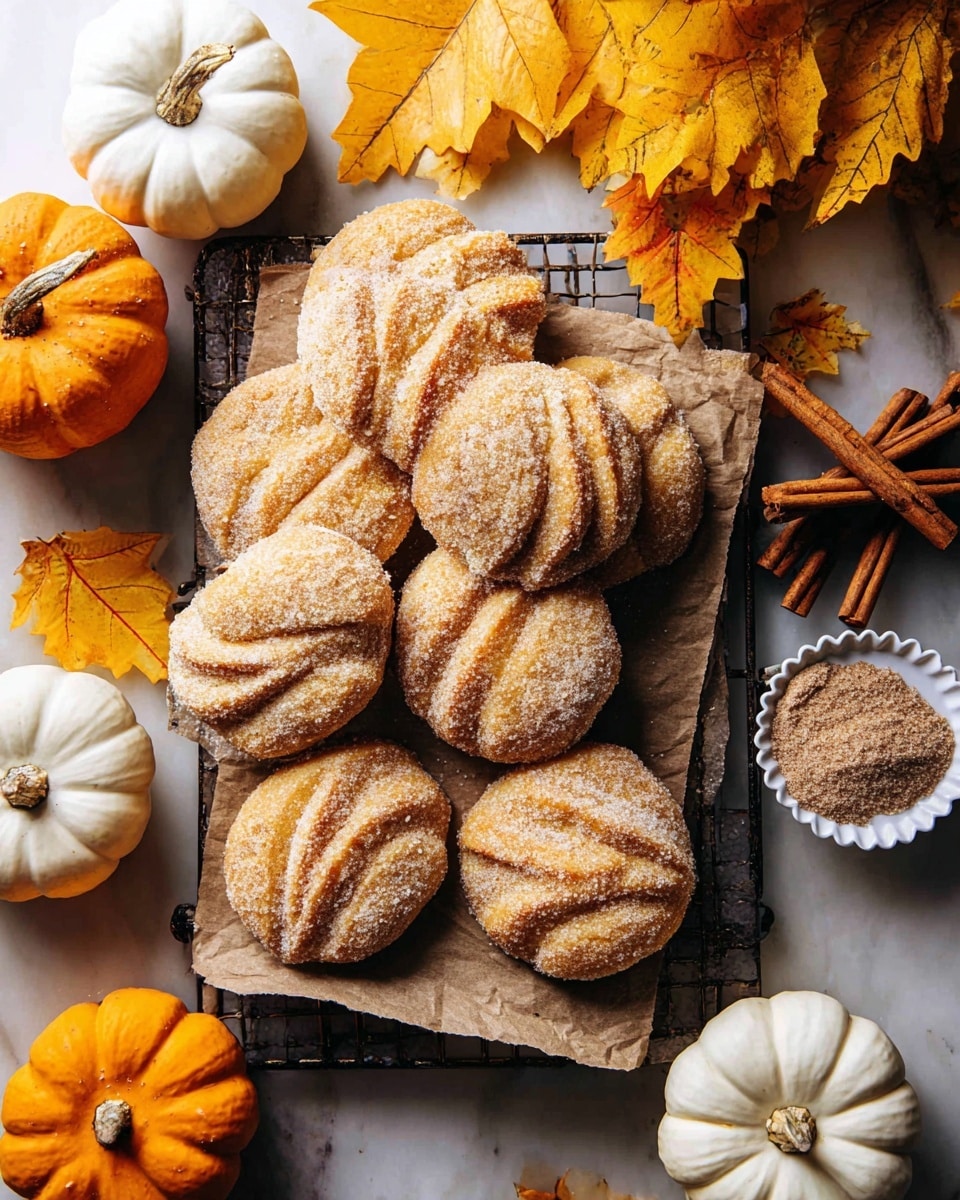
- Step 6: Using a pumpkin-shaped cookie cutter or a homemade template about 3.5″ wide by 3″ tall, cut out pumpkin shapes from the dough. Re-roll scraps to cut out additional shapes, aiming for about 10 pumpkins per sheet.
- Step 7: Transfer cut pumpkins to the refrigerator while you cut the second sheet the same way.
- Step 8: Place half of the pumpkin dough shapes on the baking sheet, spaced evenly. If they don’t all fit, bake in batches.
- Step 9: Spoon about 1 tablespoon of the filling onto the center of each dough pumpkin, leaving a small border around the edges.
- Step 10: Beat the egg with 2 teaspoons of water. Brush the exposed dough border of each filled pumpkin with the egg wash.
- Step 11: Cut 4 slits into each of the remaining dough pumpkins to resemble pumpkin ridges. Think of two sets of parentheses, one larger outside set and a narrower inner set.
- Step 12: Place the vented pumpkins on top of the filled ones and gently press the edges to seal. Crimp edges with a fork and brush the tops with egg wash.
- Step 13: Mix the cinnamon and granulated sugar in a small dish. Sprinkle about 1 teaspoon of this cinnamon sugar blend on top of each pie.
- Step 14: Bake for 12-14 minutes until golden and cooked through. Let cool on the baking sheet for 5 minutes, then transfer to a wire rack to cool completely.
- Step 15: Enjoy your delicious mini pumpkin hand pies warm or at room temperature!
Tips & Variations
- For a gluten-free version, use the pie dough recipe from my gluten-free peanut butter and jelly pop tarts. Let the dough chill before rolling and rest it if it cracks. Freeze the pies for 10 minutes before baking at 375°F for about 15 minutes.
- If you don’t have a pumpkin cookie cutter, create a sturdy template from cardboard about 3.5″ wide by 3″ tall to cut your shapes consistently.
- Customize the filling by adding a touch of vanilla extract or chopped nuts for extra flavor and texture.
Storage
Store leftover hand pies in an airtight container at room temperature for up to 2 days or refrigerate for up to 4 days. Reheat gently in a 350°F oven for 5-7 minutes to regain flakiness. These pies also freeze well—wrap individually and freeze for up to 1 month, then thaw and reheat before serving.
How to Serve
Serve this delicious recipe with your favorite sides.
FAQs
Can I use homemade pie dough instead of store-bought?
Yes, homemade pie dough works beautifully and adds a personal touch. Just make sure it’s chilled well before rolling and cutting your pumpkin shapes.
What pumpkin puree works best for this recipe?
Use plain canned pumpkin puree (not pumpkin pie filling) or homemade pumpkin puree. It provides the best texture and flavor without added spices or sweeteners.
PrintMini Pumpkin Hand Pies Recipe
These Mini Pumpkin Hand Pies are perfectly portioned fall treats made with store-bought pie dough and a creamy spiced pumpkin filling. Lightly sweetened with brown sugar and pumpkin pie spice, these hand pies are shaped like cute pumpkins, topped with cinnamon sugar, and baked to a golden finish. They’re an easy, festive dessert perfect for autumn gatherings or a cozy treat.
- Prep Time: 30 minutes
- Cook Time: 12 minutes
- Total Time: 42 minutes
- Yield: About 20 mini hand pies 1x
- Category: Dessert
- Method: Baking
- Cuisine: American
Ingredients
Pie Dough
- 1 box store bought pie dough, containing 2 sheets (see notes for gluten-free option)
Pie Filling
- 4 oz cream cheese, room temperature
- 1/2 cup (100g) light brown sugar, packed
- 1/2 cup (115g) pumpkin puree
- 1/2 tsp pumpkin pie spice
- Pinch of salt
Cinnamon Sugar Topping
- 1 large egg
- 1/2 cup (100g) granulated sugar
- 1 tsp ground cinnamon
Instructions
- Prepare the Dough and Filling: Remove the pie dough from the refrigerator and let it come to room temperature while making the filling. In a bowl, mash together the cream cheese and brown sugar with a fork until smooth. Mix in half of the pumpkin puree, then add the rest along with pumpkin pie spice and a pinch of salt, combining well.
- Preheat Oven and Prep Surface: Preheat your oven to 400°F (204°C) and line a large baking sheet with parchment paper. Lightly dust your work surface with flour to prevent sticking.
- Roll and Cut Dough: Unroll one sheet of pie dough and gently smooth it with a rolling pin, evening out wrinkles but not rolling too thin. Using a pumpkin-shaped cookie cutter or a cardboard template about 3.5″ wide by 3″ tall, cut out about 10 pumpkin shapes from the sheet. Chill these cutouts in the refrigerator while you cut the second sheet the same way.
- Fill the Pumpkins: Place half of the pumpkin dough shapes evenly spaced on the baking sheet. Spoon about one tablespoon of the pumpkin filling into the center of each, leaving a small border around the edges.
- Apply Egg Wash and Create Vents: Beat the egg with 2 teaspoons water to make an egg wash. Brush the edges of the filled pumpkins with this egg wash. On the remaining pumpkin cut outs, cut four slits in a pattern resembling pumpkin ridges (two sets of parentheses shapes). Place these vented tops over the filled pumpkins, gently press edges to seal, crimp with a fork, and then brush the top with egg wash.
- Sprinkle Cinnamon Sugar: Mix granulated sugar and ground cinnamon together in a small bowl. Sprinkle about one teaspoon of this cinnamon sugar on top of each hand pie.
- Bake: Bake in the preheated oven for 12-14 minutes until the pies are golden and cooked through. Allow the hand pies to cool on the baking sheet for 5 minutes before transferring to a wire rack to cool completely.
- Serve and Enjoy: Once cooled, enjoy these charming and delicious mini pumpkin hand pies as a perfect autumn treat.
Notes
- Gluten Free Option: Use the gluten free pie dough recipe from the gluten free peanut butter and jelly pop tarts on the site. Chill dough before use. If dough becomes fragile when rolling, let it rest to warm slightly. After shaping pies, freeze for 10 minutes and bake at 375°F (190°C) for about 15 minutes.
- Pumpkin Template: The pumpkin shape template used is 3.5″ wide by 3″ tall, made from sturdy cardboard for easy cutting. Alternatively, use a pumpkin cookie cutter.
Keywords: pumpkin hand pies, mini hand pies, fall dessert, pumpkin dessert, easy pumpkin pie, hand pies, autumn treats